
Please note: The approach described in this post is promising but is not advised for live websites at this stage. The information is intended for educational and experimental use. We urge users to proceed with caution, and maintain proper backups.
The incorporation of artificial intelligence, particularly Generative Pre-trained Transformers (GPTs), is significantly changing our interaction with digital content. This article explores the practical application of integrating a custom GPT model with WordPress, a widely-used content management system.
WordPress, renowned for its user-friendly features, is a major player in the web domain. Integrating it with a custom GPT model offers new functionalities and improved user experiences, merging human creativity with machine intelligence in web development.
This guide examines the integration of AI with WordPress, covering its technical aspects, advantages, and varied applications. It touches on areas like automated content generation and dynamic user engagement, presenting valuable insights for developers, content creators, and technology enthusiasts interested in AI-enhanced web experiences.
Table of Contents
What is a Custom GPT?
Custom GPTs are a recent innovation by OpenAI, allowing for personalized AI applications. These custom GPTs enable users to tailor the powerful capabilities of ChatGPT for specific tasks, ranging from everyday activities to professional uses, without needing any coding expertise.
The creation process is user-friendly, involving simple instructions and knowledge input, making AI tool creation accessible to everyone. This democratization of AI technology empowers various individuals and businesses to integrate AI into their workflows, enhancing productivity and user experiences.
OpenAI prioritizes data privacy and safety in custom GPTs. Users have control over their data, with strict policies in place to ensure ethical usage and prevent misuse. As the technology advances, custom GPTs are expected to evolve into more sophisticated ‘agents’, capable of performing complex tasks in the real world, further pushing the boundaries of AI applications.
Why Integrate GPT with WordPress?
Integrating ChatGPT with WordPress serves as a powerful UI tool, transforming how website owners and developers interact with their WordPress site. This integration brings several key benefits:
- High-Quality Content Creation: ChatGPT excels in generating engaging, well-written text, making it invaluable for creating and editing blog posts, pages, and other website content.
- Expert WordPress Knowledge: With its extensive knowledge of WordPress functionalities, ChatGPT can offer immediate assistance for any WordPress-related queries or challenges, from basic usage to advanced customization.
- Coding Assistance: ChatGPT’s understanding of coding can help users troubleshoot issues, implement customizations, and optimize their WordPress site for better performance and functionality.
- Streamlined Site Management: By serving as a UI for WordPress, ChatGPT simplifies site management tasks, allowing users to handle various aspects of their site through intuitive, conversational commands.
- Innovative Image Generation: With the ability to generate images, ChatGPT can assist in creating visually appealing content, enhancing the overall aesthetic of the website.
- Competitive Edge: Utilizing ChatGPT for WordPress management can give your site a competitive advantage, leveraging AI for efficiency, creativity, and enhanced user engagement.
Integrating ChatGPT with WordPress not only streamlines website management but also opens up new possibilities for content creation, site customization, and user interaction.
Creating Your Custom GPT for WordPress Management
Building a custom GPT specifically designed for managing WordPress sites can revolutionize how you approach blogging. Here’s how to create a GPT, which utilizes the WordPress REST API for seamless site management and blog post creation.
Step 1: Accessing GPT Builder
First, log into your ChatGPT Plus or Enterprise account. In the sidebar, click on Explore and then navigate to ‘My GPTs’ to begin the process.
Step 2: Initiating Your Custom GPT
Click ‘Create a GPT’ within the ‘My GPTs’ section. This action will launch the GPT Builder, a user-friendly interface for designing your chatbot.
Step 3: Defining the GPT’s Role
In the GPT builder, start by telling what your chatbot is supposed to do and how it should behave. You can use this initial prompt as a starting point:
This GPT is an adept assistant for managing WordPress sites, utilizing the WordPress REST API. Specialized in crafting blog posts on various topics, it includes detailed subheadings and structured content. It constructs posts with coherent paragraphs, covering different aspects of the topic for a comprehensive article ready for publication. It asks for clarifications when necessary to ensure content accuracy and quality.Step 4: Customizing Skills and Abilities
Enhance your custom GPT with features such as web browsing and image creation. Later in this article, we’ll guide you through integrating your GPT with your WordPress site using the REST API. You may choose to complete these steps now or follow along and set it up in the corresponding section.
Step 5: Personalizing Your GPT
Select an avatar for your GPT. The GPT Builder offers options to generate an image, which you can customize to align with your brand or preferences.
Step 6: Privacy Settings
Once your GPT is configured, save your settings. Decide on the privacy level – keep it private, make it public, or share via a link. Remember: anyone having access to this chatbot can make changes to your site, as if they were an administrator.
Step 7: Testing and Feedback
Test your GPT by interacting with it. Upload content or simulate scenarios to assess its responses and functionality.
Step 8: Ongoing Maintenance
Regularly update and refine your GPT based on feedback and evolving needs. Access it anytime through ‘My GPTs’ for adjustments.
Setting Up the Integration
Integrating a custom GPT with your WordPress site can significantly enhance your site’s capabilities. The process involves a few straightforward steps. Let’s walk through them:
Step 1: Configuring in GPT Builder
Begin by navigating to the “Configure” tab in the GPT Builder. This is where you will instruct your AI on how to interact with WordPress. Click on the “Add Action” button, and in the overlay that appears, paste the provided code in the Schema field and replace the example.com placeholder URL in it. For convenience, enter your site URL in the text field above to automatically customize the code with your URL.
{
"openapi": "3.1.0",
"info": {
"title": "WordPress REST API",
"description": "REST API for WordPress, covering posts, pages, media, themes, plugins, and settings.",
"version": "1.0.0"
},
"servers": [
{
"url": "https://www.example.com/wp-json",
"description": "WordPress API server"
}
],
"paths": {
"/wp/v2/posts": {
"get": {
"summary": "Retrieves a list of posts",
"operationId": "getPosts",
"responses": {
"200": {
"description": "A list of posts",
"content": {
"application/json": {
"schema": {
"type": "array",
"items": {
"$ref": "#/components/schemas/Post"
}
}
}
}
}
}
},
"post": {
"summary": "Creates a new post",
"operationId": "createPost",
"requestBody": {
"required": true,
"content": {
"application/json": {
"schema": {
"$ref": "#/components/schemas/Post"
}
}
}
},
"responses": {
"201": {
"description": "A new post created",
"content": {
"application/json": {
"schema": {
"$ref": "#/components/schemas/Post"
}
}
}
}
}
}
},
"/wp/v2/posts/{id}": {
"get": {
"summary": "Retrieves a specific post by ID",
"operationId": "getPostById",
"parameters": [
{
"name": "id",
"in": "path",
"required": true,
"schema": {
"type": "integer"
}
}
],
"responses": {
"200": {
"description": "A specific post",
"content": {
"application/json": {
"schema": {
"$ref": "#/components/schemas/Post"
}
}
}
}
}
},
"delete": {
"summary": "Deletes a specific post",
"operationId": "deletePost",
"parameters": [
{
"name": "id",
"in": "path",
"required": true,
"schema": {
"type": "integer"
}
}
],
"responses": {
"200": {
"description": "Post deleted"
}
}
}
},
"/wp/v2/pages": {
"get": {
"summary": "Retrieves a list of pages",
"operationId": "getPages",
"responses": {
"200": {
"description": "A list of pages",
"content": {
"application/json": {
"schema": {
"type": "array",
"items": {
"$ref": "#/components/schemas/Page"
}
}
}
}
}
}
},
"post": {
"summary": "Creates a new page",
"operationId": "createPage",
"requestBody": {
"required": true,
"content": {
"application/json": {
"schema": {
"$ref": "#/components/schemas/Page"
}
}
}
},
"responses": {
"201": {
"description": "A new page created",
"content": {
"application/json": {
"schema": {
"$ref": "#/components/schemas/Page"
}
}
}
}
}
}
},
"/wp/v2/pages/{id}": {
"get": {
"summary": "Retrieves a specific page by ID",
"operationId": "getPageById",
"parameters": [
{
"name": "id",
"in": "path",
"required": true,
"schema": {
"type": "integer"
}
}
],
"responses": {
"200": {
"description": "A specific page",
"content": {
"application/json": {
"schema": {
"$ref": "#/components/schemas/Page"
}
}
}
}
}
},
"delete": {
"summary": "Deletes a specific page",
"operationId": "deletePage",
"parameters": [
{
"name": "id",
"in": "path",
"required": true,
"schema": {
"type": "integer"
}
}
],
"responses": {
"200": {
"description": "Page deleted"
}
}
}
},
"/wp/v2/themes": {
"get": {
"summary": "Retrieves a list of themes",
"operationId": "getThemes",
"responses": {
"200": {
"description": "A list of themes",
"content": {
"application/json": {
"schema": {
"type": "array",
"items": {
"$ref": "#/components/schemas/Theme"
}
}
}
}
}
}
}
},
"/wp/v2/plugins": {
"get": {
"summary": "Retrieves a list of plugins",
"operationId": "getPlugins",
"responses": {
"200": {
"description": "A list of plugins",
"content": {
"application/json": {
"schema": {
"type": "array",
"items": {
"$ref": "#/components/schemas/Plugin"
}
}
}
}
}
}
}
},
"/wp/v2/settings": {
"get": {
"summary": "Retrieves site settings",
"operationId": "getSettings",
"responses": {
"200": {
"description": "Site settings",
"content": {
"application/json": {
"schema": {
"$ref": "#/components/schemas/Settings"
}
}
}
}
}
}
}
},
"components": {
"schemas": {
"Post": {
"type": "object",
"properties": {
"id": {
"type": "integer",
"description": "Unique identifier for the post",
"readOnly": true
},
"date": {
"type": "string",
"format": "date-time",
"description": "The date the post was published",
"readOnly": true
},
"title": {
"type": "string",
"description": "The title of the post"
},
"content": {
"type": "string",
"description": "The content of the post"
},
"status": {
"type": "string",
"description": "The status of the post"
},
"author": {
"type": "integer",
"description": "The ID of the user who authored the post"
},
"excerpt": {
"type": "string",
"description": "The excerpt of the post"
}
},
"required": [
"title",
"content"
]
},
"Page": {
"type": "object",
"properties": {
"id": {
"type": "integer",
"description": "Unique identifier for the page",
"readOnly": true
},
"date": {
"type": "string",
"format": "date-time",
"description": "The date the page was published",
"readOnly": true
},
"title": {
"type": "string",
"description": "The title of the page"
},
"content": {
"type": "string",
"description": "The content of the page"
},
"status": {
"type": "string",
"description": "The status of the page"
},
"author": {
"type": "integer",
"description": "The ID of the user who authored the page"
},
"excerpt": {
"type": "string",
"description": "The excerpt of the page"
}
},
"required": [
"title",
"content"
]
},
"Media": {
"type": "object",
"properties": {
"id": {
"type": "integer",
"description": "Unique identifier for the media item",
"readOnly": true
},
"date": {
"type": "string",
"format": "date-time",
"description": "The date the media was uploaded",
"readOnly": true
},
"title": {
"type": "string",
"description": "The title of the media item"
},
"url": {
"type": "string",
"description": "URL of the media item"
},
"author": {
"type": "integer",
"description": "The ID of the user who uploaded the media item"
},
"mime_type": {
"type": "string",
"description": "The MIME type of the media item"
},
"status": {
"type": "string",
"description": "The status of the media item"
}
},
"required": [
"title"
]
},
"Theme": {
"type": "object",
"properties": {
"theme_slug": {
"type": "string",
"description": "The slug of the theme"
},
"name": {
"type": "string",
"description": "The name of the theme"
},
"description": {
"type": "string",
"description": "Description of the theme"
},
"version": {
"type": "string",
"description": "The version of the theme"
},
"author": {
"type": "string",
"description": "The author of the theme"
},
"screenshot_url": {
"type": "string",
"format": "uri",
"description": "URL of the theme's screenshot"
},
"status": {
"type": "string",
"description": "The status of the theme (active or inactive)"
}
},
"required": [
"theme_slug",
"name"
]
},
"Plugin": {
"type": "object",
"properties": {
"plugin_slug": {
"type": "string",
"description": "The slug of the plugin"
},
"name": {
"type": "string",
"description": "The name of the plugin"
},
"description": {
"type": "string",
"description": "Description of the plugin"
},
"version": {
"type": "string",
"description": "The version of the plugin"
},
"author": {
"type": "string",
"description": "The author of the plugin"
},
"status": {
"type": "string",
"enum": [
"active",
"inactive"
],
"description": "The status of the plugin (active or inactive)"
}
},
"required": [
"plugin_slug",
"name"
]
},
"Settings": {
"type": "object",
"properties": {
"title": {
"type": "string",
"description": "The title of the site"
},
"description": {
"type": "string",
"description": "The description of the site"
},
"url": {
"type": "string",
"format": "uri",
"description": "The URL of the site"
},
"email": {
"type": "string",
"format": "email",
"description": "The administrative email address"
},
"timezone": {
"type": "string",
"description": "The timezone of the site"
},
"date_format": {
"type": "string",
"description": "The date format used on the site"
},
"time_format": {
"type": "string",
"description": "The time format used on the site"
},
"start_of_week": {
"type": "integer",
"description": "The first day of the week"
},
"language": {
"type": "string",
"description": "The default language of the site"
},
"use_smilies": {
"type": "boolean",
"description": "Whether to convert emoticons to graphics"
},
"posts_per_page": {
"type": "integer",
"description": "Number of posts to show on a page."
}
},
"required": [
"title",
"url"
]
}
}
}
}This code snippet is crucial as it “teaches” your ChatGPT how to use some basic functions of the WordPress REST API, enabling it to manage content on your site effectively. Specifically, ChatGPT will be equipped with the following capabilities:
- Read posts
- Write new posts
- Delete posts
- Read pages
- Write new pages
- Delete pages
- Get the list of installed themes
- Get the list of installed plugins
- Get site settings, like site title, tagline, posts per page option, etc.
After pasting the code, you should see a list of actions appearing in the “Available actions” section below the textarea. These actions represent the various tasks your AI can perform using the WordPress REST API.
Step 2: Making Your Site’s REST API Accessible
For ChatGPT to interact with your WordPress site, the site’s REST API needs to be accessible, so that ChatGPT can reach it. This can be achieved through two primary methods: OAuth and simple API key-based authentication.
- OAuth: A more secure method that involves a token-based authorization mechanism. It’s ideal for applications that require access to private data. However, setting up OAuth can be more complex.
- Simple API Key: A straightforward approach, providing a unique key for API access. It’s easier to set up but is generally less secure than OAuth.
Depending on your site’s needs and your technical expertise, you can choose the method that best fits your scenario.
For those opting for simple API key-based authentication, you can download our simple plugin, which adds this functionality to your site seamlessly and without any unnecessary extras: Download the REST API Key Auth Plugin. The code is available on Github, too. After activating the plugin, head over to its settings page (Settings » Rest API Key Authentication) to copy your API key.
Step 3: Adding Authentication Details
In the “Authentication” section of the actions modal, add your site’s REST API details. This step is crucial for establishing a secure connection between ChatGPT and your WordPress site.
If you chose to use our API key plugin, you must select Authentication Type: API Key, then paste your key in the API Key field. Below that, set Auth Type: Custom, and in the Custom Header Name field, type “X-Api-Key“. Save it.
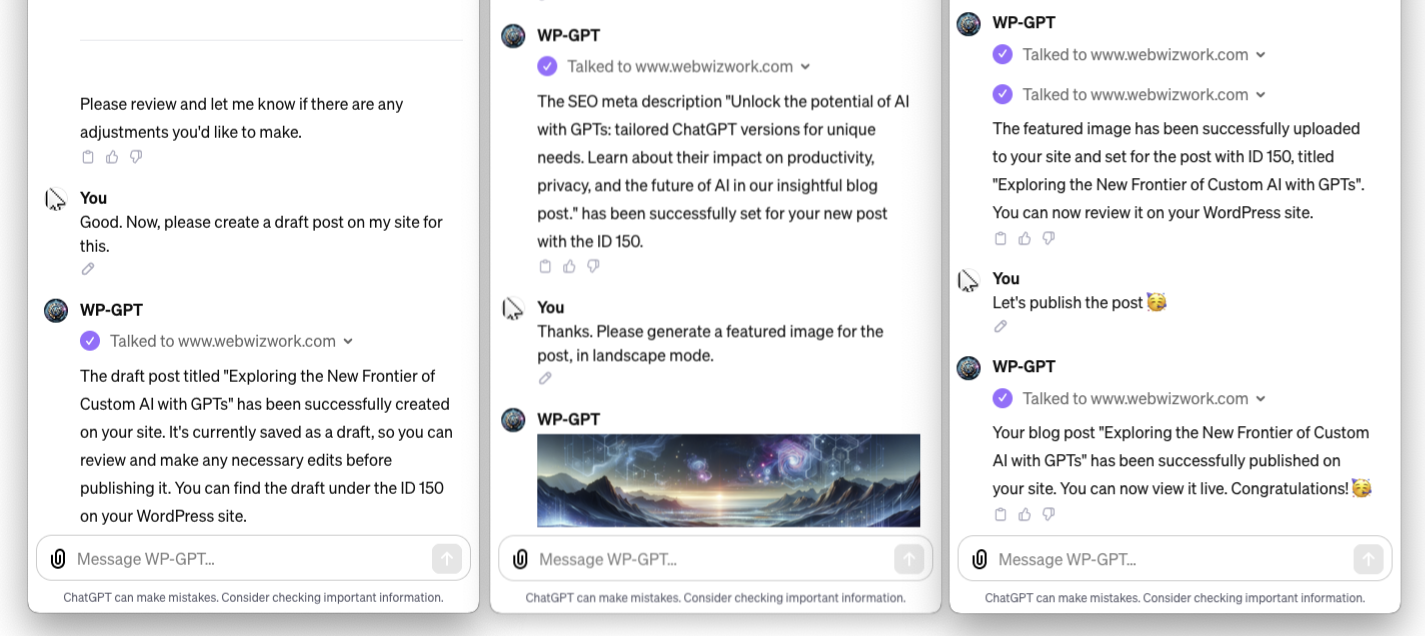
Testing the integration
Once you have successfully integrated your custom GPT with your WordPress site, it’s crucial to test the functionality to ensure everything is working as expected. A simple yet effective way to test this integration is by asking the ChatGPT chatbot about the title of your latest post. This method verifies if the GPT can correctly retrieve data from your WordPress site. You can also ask it to create a new “Hello World” draft post on your site.
Advanced Customization and Usage
The integration of a custom GPT with your WordPress site opens a world of possibilities for advanced customization and usage. This flexibility allows you to tailor the AI’s capabilities to your specific needs, the type or topics of your site, and much more. Let’s explore how you can harness this potential to enhance your WordPress experience.
Tailoring GPT to Your Site’s Needs
1. Customize for Specific Topics or Niches: Your custom GPT can be trained to specialize in the specific topics or niches relevant to your site. Whether you’re running a tech blog, a lifestyle magazine, or a business portfolio, you can instruct the GPT to focus on content that aligns with your site’s theme. This ensures that the content generated is relevant and engaging for your target audience.
2. Upload documents to make use of Retrieval Augmented Generation: The RAG technology bolsters a GPT’s capacity to incorporate targeted documents or databases, thereby elevating the accuracy and quality of its generated content. By uploading content relevant to your site’s focus, RAG can substantially enhance the GPT’s output. For instance, in a website featuring products or services, integrating product catalogs or databases empowers the GPT to create precise and comprehensive product descriptions, reviews, and comparisons.
Customizing Interactions and Responses
The way your GPT interacts with users can also be customized. Depending on your audience, you may want a more formal tone or a conversational style. You can even program the GPT to respond differently to various user inputs, creating a dynamic and engaging user experience.
Continuous Learning and Updating
One of the most significant advantages of using a custom GPT is its ability to learn and evolve. Regularly updating the GPT with new information, feedback, and data ensures that it stays current and continues to meet the evolving needs of your site and its audience.
Customizing your GPT for WordPress is not just about automation; it’s about creating a smarter, more responsive, and more engaging online presence. By tailoring the GPT’s capabilities to your site’s specific needs and continuously updating it with new information, you can create a dynamic, SEO-friendly, and user-focused experience that stands out in the digital landscape.
Security Considerations
Integrating a custom GPT with your WordPress site offers numerous benefits, but it also brings forth important security considerations. Ensuring the safety and integrity of your website is paramount, especially when incorporating advanced AI functionalities. Let’s delve into the key security aspects and best practices for maintaining a secure WordPress site with AI integration.
Understanding the Security Implications
1. Data Privacy and Protection: When your GPT interacts with your WordPress site, it may handle sensitive data. It’s crucial to understand how this data is processed and stored.
2. Access Control: The GPT, when integrated with the WordPress REST API, has extensive access to your site. It’s important to manage and restrict this access appropriately. Ensure that only necessary permissions are granted to the GPT to perform its functions.
Best Practices for Secure Integration
1. Strong Authentication Methods: If your integration uses API keys or OAuth tokens, ensure these are kept secure. Use strong, unique passwords and consider implementing two-factor authentication for added security.
2. Monitor and Audit Activity: Regularly monitor the activities performed by the GPT on your WordPress site. Set up alerts for unusual activities or access patterns, and audit logs periodically to ensure everything is functioning as expected.
3. Secure API Connections: When your GPT communicates with your WordPress site, ensure that the connection is secure. Use HTTPS to encrypt the data transmitted between your GPT and the website.
4. Limit Data Exposure: Be cautious about the amount and type of data your GPT can access. Limit its access to only what’s necessary for its operations to reduce the risk of data breaches.
5. Backup Regularly: Regular backups of your WordPress site can be a lifesaver in case of security breaches or data loss. Ensure that you have a reliable backup and recovery plan in place.
The Future of AI in WordPress Management
The concept of AI as a user interface (UI) is becoming increasingly tangible. With advancements in natural language processing and machine learning, AI is poised to become a more intuitive, interactive, and user-friendly interface for WordPress management. This evolution suggests a future where AI can understand complex queries, automate routine tasks, and offer personalized recommendations, making WordPress management more efficient and accessible.
Continuous Evolution of Custom GPTs
This article highlights that custom GPTs are continuously evolving, with notable changes in UI and functionalities even during its writing. This fast-paced development presents both opportunities and challenges, necessitating ongoing adaptability and learning for users.
Potential Future Developments
Looking ahead, we can anticipate several key areas of advancement in AI-powered WordPress management:
- Enhanced Content Creation and Optimization: AI will likely become even more sophisticated in generating and optimizing content, potentially including advanced SEO techniques and more nuanced audience targeting.
- Automated Site Management: We can expect AI to play a larger role in site maintenance, including automated updates, security monitoring, and performance optimization.
- Personalized User Experiences: AI could enable highly personalized user experiences on WordPress sites, using data analytics to tailor content, layout, and interactions to individual visitor preferences.
- Improved Accessibility and Inclusivity: AI has the potential to make WordPress more accessible, offering features like automated content translation, voice commands, and adaptive interfaces for diverse user needs.
Conclusion
Incorporating a custom GPT model into WordPress marks a notable progression in website management and content generation. This integration allows for a more streamlined and adaptable method of handling digital content. Utilizing AI in WordPress aids in automating mundane tasks, producing inventive content, and refining user engagement, ultimately improving the functionality and user experience of websites. As AI technology advances, its combination with WordPress is set to foster further innovation and efficiency in web development.